Dublo
Dublo
Most teams that need a data platform don't need six months and a platform team. They need data landing somewhere reliable, models that turn it into numbers people trust, and a schedule that keeps it fresh. I built exactly that in one week: Postgres on AWS, Airbyte, Snowflake, dbt and Airflow, with a dashboard at the end.
This post walks through every layer, with the code, for founders who want to know what "a data platform" actually involves and for data engineers who want a working reference. I've also updated it for late 2026: what I'd keep, what I'd change, and how the same setup makes a team ready for AI.
What does this data platform do?#
The goal was simple: a fully working pipeline that refreshes analytics tables and a dashboard every day, without anyone touching it.
The business question behind it: how are our subscription plans performing? Which plan brings the most net revenue, and how much discount are we giving away per plan?
The full code is on GitHub: Dorianteffo/modern-data-platform.
What does the architecture look like?#
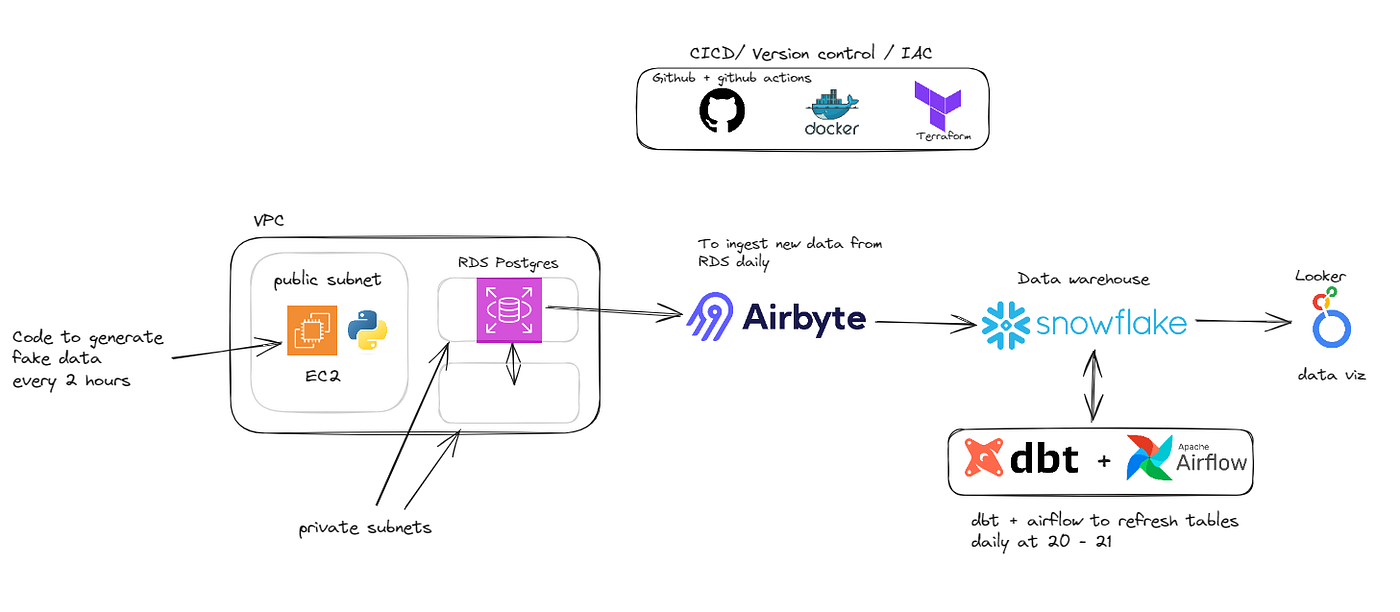
Here is the same flow as a diagram:
Every data platform answers the same four questions. Here is how I answered them:
| Question | What I used | Why |
|---|---|---|
| Where does the data come from? | RDS PostgreSQL, fed by a Python script on EC2 every 2 hours | A realistic, constantly changing source instead of flat files |
| Where is it stored for analytics? | Snowflake | Separate compute and storage, easy role model, pay per second |
| How do we move it? | Airbyte Cloud | Incremental sync with deduplication in about 10 minutes of setup |
| How do we make it usable? | dbt, scheduled by Airflow with Cosmos | SQL models with tests, version control and lineage, run on a schedule |
If you want the strategy view before the build, I wrote about the layers of a modern data infrastructure separately. This post is the hands-on version.
Step 1: How do you set up the source database?#
I was tired of tutorials built on static CSV files. Real platforms deal with data that changes all the time, so I wrote a Python script that generates fake users, subscriptions, credit cards, bank accounts and Stripe-style transactions, and appends them to Postgres every 2 hours.
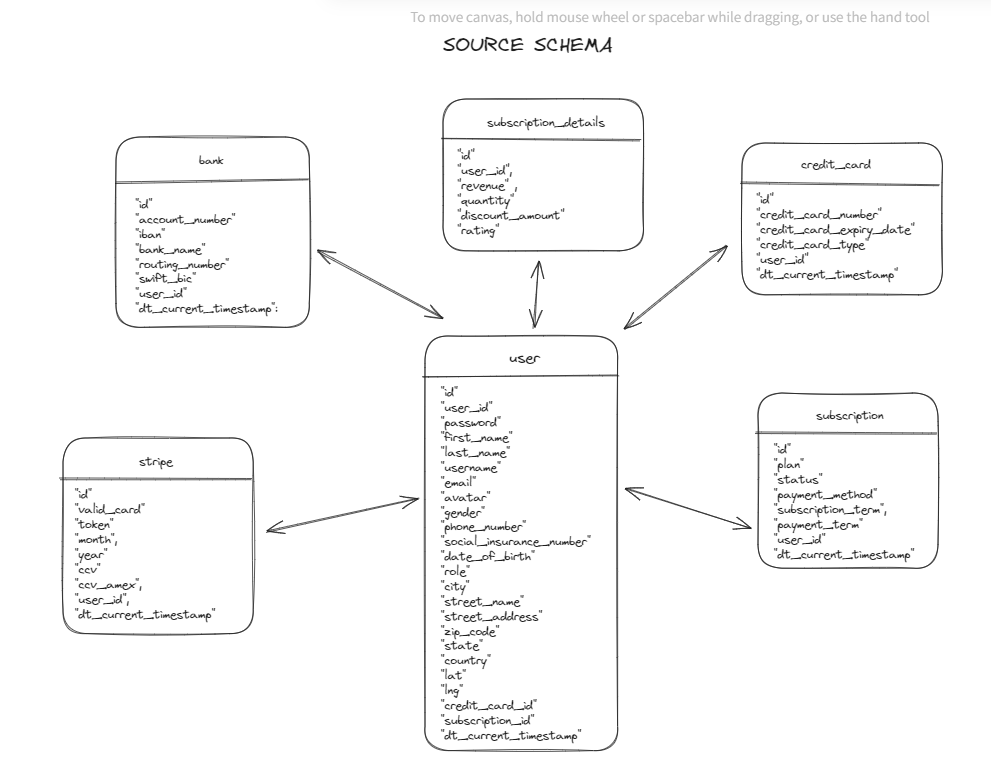
The model is intentionally basic and dirty: duplicates, Unix timestamps stored as text, numbers stored as strings. That gives the transformation layer real work to do.
Provisioning the network and RDS with Terraform#
Everything on AWS is Terraform:
- A VPC with two private subnets for RDS and one public subnet.
- An RDS PostgreSQL instance in the private subnets. It is not publicly accessible.
- One EC2 instance in the public subnet. It runs the generator and doubles as an SSH bastion so Airbyte can reach the private database.
Here is the RDS part, updated for 2026. Compared with my original version, Postgres only accepts traffic from the EC2 security group (not
0.0.0.0/0), the master password lives in Secrets Manager, storage is encrypted, and logical replication is on so you can switch Airbyte to CDC later.
resource "aws_security_group" "rds_sg" {
  name   = "rds-sg"
  vpc_id = aws_vpc.custom_vpc.id

  ingress {
    description     = "Postgres from the generator/bastion EC2 only"
    from_port       = 5432
    to_port         = 5432
    protocol        = "tcp"
    security_groups = [aws_security_group.ec2_sg.id]
  }

  egress {
    from_port   = 0
    to_port     = 0
    protocol    = "-1"
    cidr_blocks = ["0.0.0.0/0"]
  }
}

resource "aws_db_parameter_group" "pg17_cdc" {
  name   = "pg17-cdc"
  family = "postgres17"

  parameter {
    name         = "rds.logical_replication"
    value        = "1"
    apply_method = "pending-reboot"
  }
}

resource "aws_db_instance" "app_rds" {
  identifier                  = "app-postgres"
  engine                      = "postgres"
  engine_version              = "17"
  instance_class              = "db.t4g.micro"
  allocated_storage           = 20
  db_name                     = var.database_name
  username                    = var.username_db
  manage_master_user_password = true
  storage_encrypted           = true
  parameter_group_name        = aws_db_parameter_group.pg17_cdc.name
  db_subnet_group_name        = aws_db_subnet_group.custom_subnet_group.name
  vpc_security_group_ids      = [aws_security_group.rds_sg.id]
  publicly_accessible         = false
  skip_final_snapshot         = true
}
The EC2 instance for the generator#
The EC2 instance uses an Ubuntu 24.04 AMI, installs Docker on boot, and gets an IAM role so it can be managed through AWS Systems Manager (SSM) and pull images from ECR. No SSH key needed for deployments.
data "aws_ami" "ubuntu" {
  most_recent = true
  owners      = ["099720109477"] # Canonical

  filter {
    name   = "name"
    values = ["ubuntu/images/hvm-ssd-gp3/ubuntu-noble-24.04-amd64-server-*"]
  }
}

resource "aws_iam_role" "ec2_ssm" {
  name = "data-generator-ec2"
  assume_role_policy = jsonencode({
    Version = "2012-10-17"
    Statement = [{
      Effect    = "Allow"
      Action    = "sts:AssumeRole"
      Principal = { Service = "ec2.amazonaws.com" }
    }]
  })
}

resource "aws_iam_role_policy_attachment" "ssm_core" {
  role       = aws_iam_role.ec2_ssm.name
  policy_arn = "arn:aws:iam::aws:policy/AmazonSSMManagedInstanceCore"
}

resource "aws_iam_role_policy_attachment" "ecr_read" {
  role       = aws_iam_role.ec2_ssm.name
  policy_arn = "arn:aws:iam::aws:policy/AmazonEC2ContainerRegistryReadOnly"
}

resource "aws_iam_instance_profile" "ssm" {
  name = "data-generator-ec2"
  role = aws_iam_role.ec2_ssm.name
}

resource "aws_instance" "generator" {
  ami                    = data.aws_ami.ubuntu.id
  instance_type          = "t3.small"
  subnet_id              = aws_subnet.public_subnet.id
  vpc_security_group_ids = [aws_security_group.ec2_sg.id]
  iam_instance_profile   = aws_iam_instance_profile.ssm.name

  user_data = <<-EOF
    #!/bin/bash
    curl -fsSL https://get.docker.com | sh
    usermod -aG docker ubuntu
  EOF

  tags = { Name = "data-generator" }
}
The bastion still needs port 22 open for Airbyte's SSH tunnel. Restrict that rule to Airbyte Cloud's published IP addresses instead of the whole internet.
Deploying the generator with GitHub Actions#
My original pipeline copied files over SSH with a long-lived private key stored in GitHub secrets. In 2026 I'd use OIDC: GitHub gets short-lived AWS credentials for one run, builds the image, pushes it to ECR, and tells the instance to restart the container through SSM.
name: deploy-data-generator

on:
  push:
    branches: [main]
    paths: ["data_generator/**"]

permissions:
  id-token: write   # required for OIDC
  contents: read

jobs:
  deploy:
    runs-on: ubuntu-latest
    env:
      AWS_REGION: eu-west-3
    steps:
      - uses: actions/checkout@v5

      - uses: aws-actions/configure-aws-credentials@v5
        with:
          role-to-assume: ${{ vars.AWS_DEPLOY_ROLE_ARN }}
          aws-region: ${{ env.AWS_REGION }}

      - id: ecr
        uses: aws-actions/amazon-ecr-login@v2

      - name: Build and push image
        env:
          IMAGE: ${{ steps.ecr.outputs.registry }}/data-generator:${{ github.sha }}
        run: |
          docker build -t "$IMAGE" data_generator
          docker push "$IMAGE"

      - name: Restart the container on EC2 via SSM
        env:
          REGISTRY: ${{ steps.ecr.outputs.registry }}
          IMAGE: ${{ steps.ecr.outputs.registry }}/data-generator:${{ github.sha }}
        run: |
          aws ssm send-command \
            --instance-ids "${{ vars.GENERATOR_INSTANCE_ID }}" \
            --document-name "AWS-RunShellScript" \
            --comment "deploy ${GITHUB_SHA}" \
            --parameters commands="aws ecr get-login-password --region $AWS_REGION | docker login --username AWS --password-stdin $REGISTRY && docker pull $IMAGE && (docker rm -f data-generator || true) && docker run -d --name data-generator --restart unless-stopped --env-file /opt/data-generator/.env $IMAGE"
The database credentials sit in /opt/data-generator/.env on the instance (or better, pulled from Secrets Manager at startup), not in the workflow. I cover the reasoning behind this pattern in CI/CD for data engineering.
Step 2: How should you structure Snowflake for analytics?#
Data now lands in RDS every 2 hours. The target is Snowflake, and the structure matters more than the tool choice. I used three databases and two roles:
| Object | Purpose |
|---|---|
RAW | Raw data from Airbyte, schema postgres_airbyte. Nobody edits it. |
ANALYTICS | Production. Schemas staging, intermediate and finance (marts). |
DBT_DEV | Development. Same schemas as production, so you can test without breaking dashboards. |
AIRBYTE_ROLE | Writes to RAW.postgres_airbyte only. |
DATA_ENGINEER | Reads RAW, owns ANALYTICS and DBT_DEV. dbt runs with this role. |
In the original post I told readers to "Google it". Here is the SQL instead:
USE ROLE SYSADMIN;
CREATE WAREHOUSE IF NOT EXISTS LOADING_WH
  WAREHOUSE_SIZE = XSMALL AUTO_SUSPEND = 60 AUTO_RESUME = TRUE INITIALLY_SUSPENDED = TRUE;
CREATE WAREHOUSE IF NOT EXISTS TRANSFORM_WH
  WAREHOUSE_SIZE = XSMALL AUTO_SUSPEND = 60 AUTO_RESUME = TRUE INITIALLY_SUSPENDED = TRUE;

CREATE DATABASE IF NOT EXISTS RAW;
CREATE SCHEMA IF NOT EXISTS RAW.POSTGRES_AIRBYTE;
CREATE DATABASE IF NOT EXISTS ANALYTICS;
CREATE DATABASE IF NOT EXISTS DBT_DEV;

USE ROLE SECURITYADMIN;
CREATE ROLE IF NOT EXISTS AIRBYTE_ROLE;
CREATE ROLE IF NOT EXISTS DATA_ENGINEER;
GRANT ROLE AIRBYTE_ROLE TO ROLE SYSADMIN;
GRANT ROLE DATA_ENGINEER TO ROLE SYSADMIN;

-- Airbyte: write raw data only
GRANT USAGE ON WAREHOUSE LOADING_WH TO ROLE AIRBYTE_ROLE;
GRANT USAGE ON DATABASE RAW TO ROLE AIRBYTE_ROLE;
GRANT ALL ON SCHEMA RAW.POSTGRES_AIRBYTE TO ROLE AIRBYTE_ROLE;

-- dbt: read raw, own the modeled databases
GRANT USAGE ON WAREHOUSE TRANSFORM_WH TO ROLE DATA_ENGINEER;
GRANT USAGE ON DATABASE RAW TO ROLE DATA_ENGINEER;
GRANT USAGE ON SCHEMA RAW.POSTGRES_AIRBYTE TO ROLE DATA_ENGINEER;
GRANT SELECT ON ALL TABLES IN SCHEMA RAW.POSTGRES_AIRBYTE TO ROLE DATA_ENGINEER;
GRANT SELECT ON FUTURE TABLES IN SCHEMA RAW.POSTGRES_AIRBYTE TO ROLE DATA_ENGINEER;
GRANT OWNERSHIP ON DATABASE ANALYTICS TO ROLE DATA_ENGINEER;
GRANT OWNERSHIP ON DATABASE DBT_DEV TO ROLE DATA_ENGINEER;

-- Service users authenticate with key pairs, not passwords
CREATE USER IF NOT EXISTS AIRBYTE_USER
  TYPE = SERVICE DEFAULT_ROLE = AIRBYTE_ROLE DEFAULT_WAREHOUSE = LOADING_WH
  RSA_PUBLIC_KEY = '<airbyte_public_key>';
CREATE USER IF NOT EXISTS DBT_USER
  TYPE = SERVICE DEFAULT_ROLE = DATA_ENGINEER DEFAULT_WAREHOUSE = TRANSFORM_WH
  RSA_PUBLIC_KEY = '<dbt_public_key>';
GRANT ROLE AIRBYTE_ROLE TO USER AIRBYTE_USER;
GRANT ROLE DATA_ENGINEER TO USER DBT_USER;
Two separate warehouses let you see loading cost and transformation cost apart, which is the first question you'll get when the Snowflake bill grows. Snowflake has also been phasing out password-only sign-in, so service users should use key-pair authentication from day one.
Step 3: How do you ingest Postgres data into Snowflake?#
My first idea was a custom Python script on AWS Lambda. That would have meant writing incremental logic and change tracking myself, which is days of work for something that already exists.
So I used Airbyte Cloud. Setup took less than 10 minutes:
- Source: Postgres, connected through the EC2 bastion with SSH key authentication.
- Destination: Snowflake, using
AIRBYTE_USERand theRAWdatabase. - Sync mode: Incremental, Append + Deduped. Airbyte only pulls new rows (using a cursor column), then keeps one row per primary key in the final table.
- Schedule: every day at 17:00. Remember this time, it matters for orchestration.
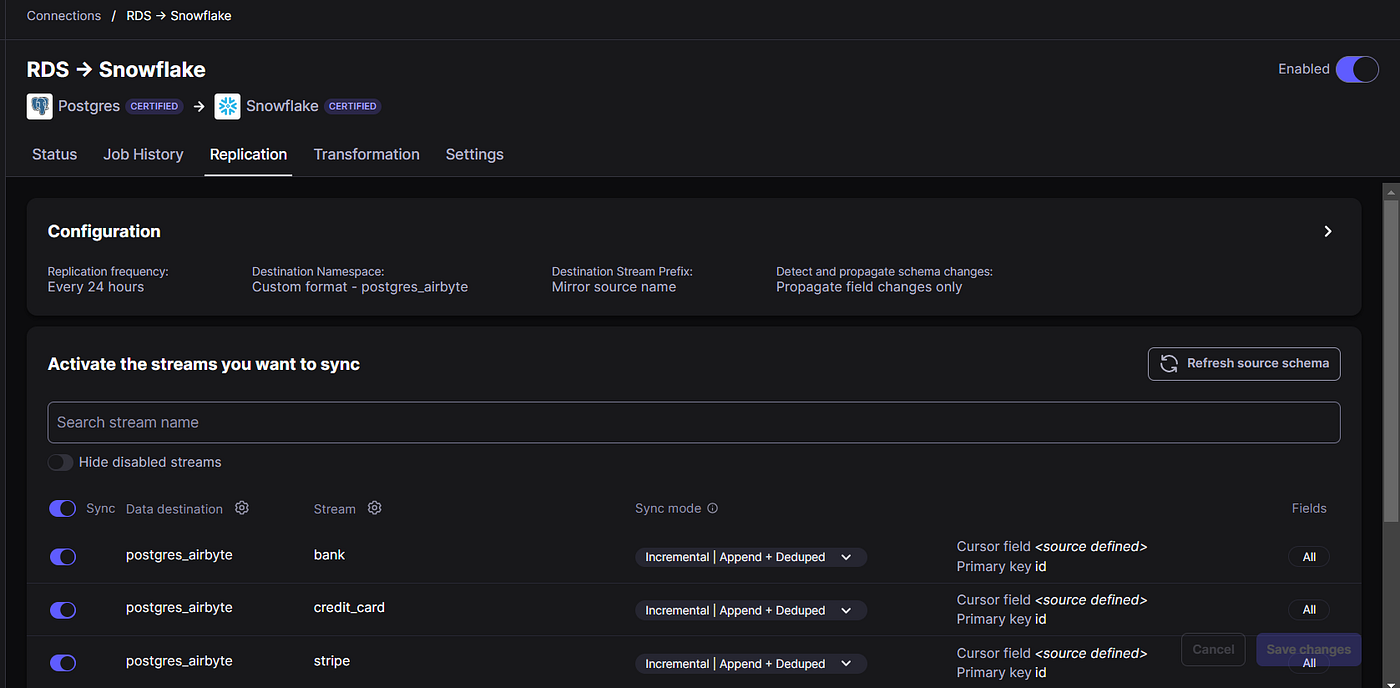
Airbyte connection settings: Postgres to Snowflake with Incremental sync mode and Append + Deduped destination mode
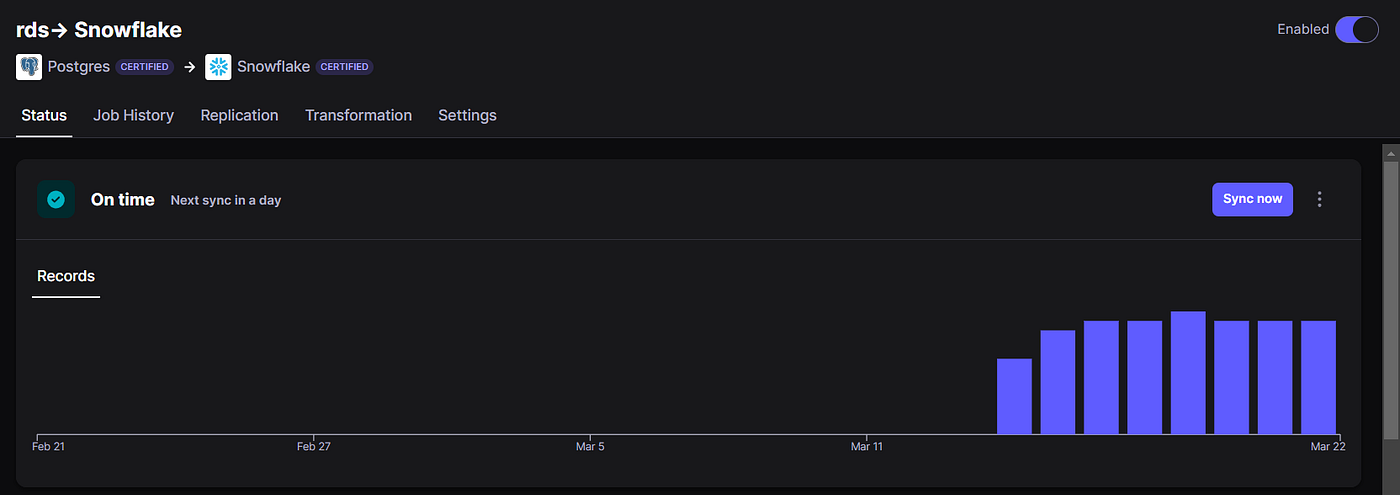
One thing to know: cursor-based incremental sync does not see deleted rows. If your source deletes data and you need that in the warehouse, switch the Postgres source to CDC (logical replication), which is why the Terraform above already turns it on.
Managed connectors are not always the right call. I compared the trade-offs in no-code ELT tools: pros and cons. For a Postgres-to-warehouse sync like this one, they are hard to beat.
Step 4: How do you model the data with dbt?#
The raw tables can't feed a dashboard directly. They have duplicates, text timestamps and a structure built for an app, not for analysis. This is where the Kimball approach comes in: one fact table for transactions, surrounded by dimension tables.
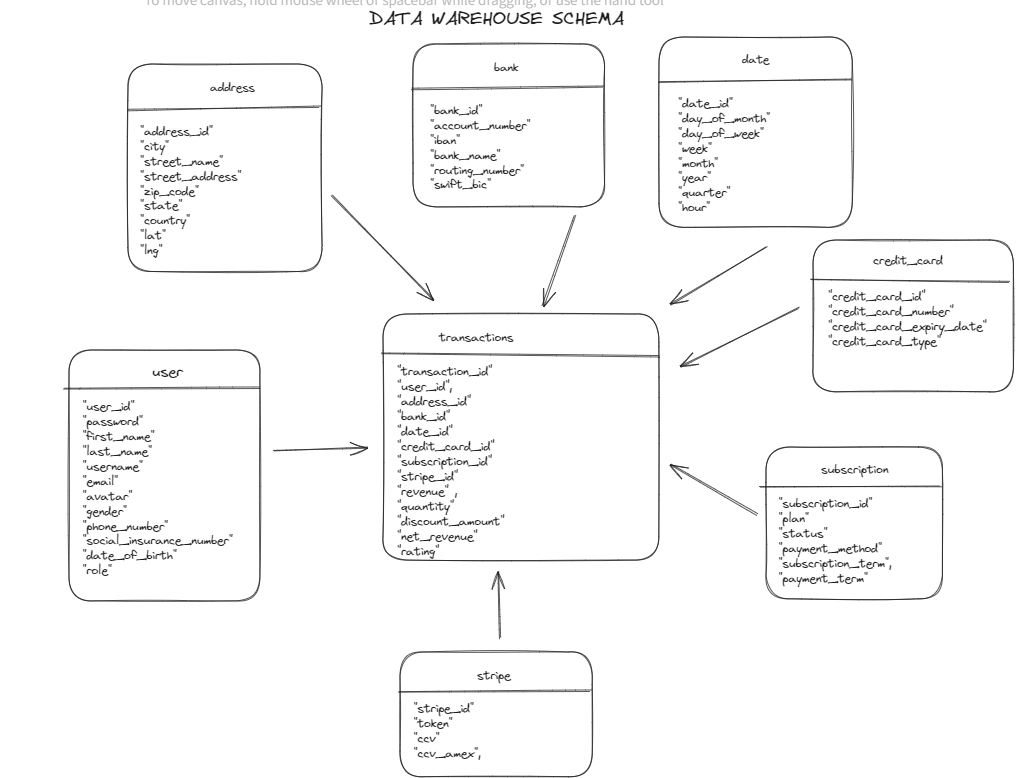
The end goal is subscription plan metrics, like total net revenue per plan. The dbt project has three layers, each materialized in its own schema.
Staging: clean and cast#
Staging models do simple renames and type casts. One model per source table. Here is stg_bank:
SELECT
    id::integer AS bank_id,
    user_id,
    account_number::integer AS account_number,
    iban,
    bank_name,
    routing_number::integer AS routing_number,
    swift_bic
FROM {{ source('app', 'bank') }}
Source tests live next to the sources, so bad data is caught before it reaches a model. On dbt 1.10 and later, test parameters go under arguments:
sources:
  - name: app
    database: RAW
    schema: postgres_airbyte
    tables:
      - name: subscription
        columns:
          - name: id
            data_tests:
              - unique
              - not_null
          - name: plan
            data_tests:
              - accepted_values:
                  arguments:
                    values: ['Standard', 'Basic', 'Platinum', 'Gold', 'Bronze']
Intermediate: facts and dimensions#
This is where the star schema gets built. Here is the date dimension, int_date, which breaks each timestamp into the parts analysts filter on:
WITH date_occurrences AS (
    SELECT
        {{ dbt_utils.generate_surrogate_key(['dt_timestamp']) }} AS date_id,
        HOUR(dt_timestamp) AS hour,
        DAY(dt_timestamp) AS day_of_month,
        DAYOFWEEKISO(dt_timestamp) AS day_of_week,
        WEEK(dt_timestamp) AS week,
        MONTH(dt_timestamp) AS month,
        CEIL(MONTH(dt_timestamp) / 3) AS quarter,
        YEAR(dt_timestamp) AS year,
        dt_timestamp,
        ROW_NUMBER() OVER (PARTITION BY dt_timestamp ORDER BY dt_timestamp DESC) AS rn
    FROM {{ ref('stg_user') }}
)

SELECT
    date_id, hour, day_of_month, day_of_week, week, month, quarter, year, dt_timestamp
FROM date_occurrences
WHERE rn = 1
The fact table, int_transactions, joins subscription details to every dimension and calculates net_revenue as revenue - discount_amount.
Unit tests for transformation logic#
In 2024 I used the dbt_unit_testing package for this. Since dbt 1.8, unit tests are native and written in YAML, so no extra package is needed. This one checks that int_date extracts the right date parts from two known timestamps:
unit_tests:
  - name: int_date_extracts_date_parts
    model: int_date
    given:
      - input: ref('stg_user')
        rows:
          - {dt_timestamp: "2024-03-16 14:15:06"}
          - {dt_timestamp: "2024-05-17 16:15:06"}
    expect:
      rows:
        - {dt_timestamp: "2024-03-16 14:15:06", hour: 14, day_of_month: 16, day_of_week: 6, week: 11, month: 3, quarter: 1, year: 2024}
        - {dt_timestamp: "2024-05-17 16:15:06", hour: 16, day_of_month: 17, day_of_week: 5, week: 20, month: 5, quarter: 2, year: 2024}
Data tests check the data. Unit tests check your logic. You want both.
Marts: the numbers the business uses#
Marts answer one question each. Total net revenue by subscription plan:
SELECT
    s.plan,
    SUM(t.net_revenue) AS total_net_revenue
FROM {{ ref('int_transactions') }} AS t
JOIN {{ ref('int_subscription') }} AS s
    ON t.subscription_id = s.subscription_id
GROUP BY s.plan
A second mart, avg_discount_amount_by_plan, follows the same pattern with AVG(t.discount_amount).
Step 5: How do you schedule dbt with Airflow and Cosmos?#
The models need to run every day after Airbyte has loaded fresh data. Airbyte syncs at 17:00, so I scheduled the DAG at 20:00. Everyone starts the next morning with fresh tables.
Astronomer Cosmos is what makes Airflow and dbt work well together. It reads your dbt project and turns every model and test into its own Airflow task, so you can see and retry a single failing model instead of rerunning the whole project.
Here is the DAG, updated for Airflow 3 and Snowflake key-pair auth:
from datetime import datetime

from airflow.providers.standard.operators.empty import EmptyOperator
from airflow.sdk import dag
from cosmos import DbtTaskGroup, ExecutionConfig, ProfileConfig, ProjectConfig, RenderConfig
from cosmos.constants import LoadMode
from cosmos.profiles import SnowflakePrivateKeyPemProfileMapping

DBT_PROJECT_PATH = "/opt/airflow/dags/dbt/dbt_transformation"
DBT_EXECUTABLE_PATH = "/opt/airflow/dbt_venv/bin/dbt"

profile_config = ProfileConfig(
    profile_name="modern_warehouse",
    target_name="prod",
    profile_mapping=SnowflakePrivateKeyPemProfileMapping(
        conn_id="snowflake_conn",
        profile_args={"database": "ANALYTICS", "schema": "staging"},
    ),
)


@dag(
    dag_id="dbt_snowflake_daily",
    schedule="0 20 * * *",  # 20:00 UTC, after the 17:00 Airbyte sync
    start_date=datetime(2024, 3, 22),
    catchup=False,
    tags=["dbt", "snowflake"],
)
def dbt_snowflake_daily():
    start = EmptyOperator(task_id="start")

    dbt_prod = DbtTaskGroup(
        group_id="dbt_prod",
        project_config=ProjectConfig(DBT_PROJECT_PATH),
        profile_config=profile_config,
        execution_config=ExecutionConfig(dbt_executable_path=DBT_EXECUTABLE_PATH),
        render_config=RenderConfig(load_method=LoadMode.DBT_LS, select=["path:models"]),
        default_args={"retries": 2},
    )

    end = EmptyOperator(task_id="end")

    start >> dbt_prod >> end


dbt_snowflake_daily()
On Airflow 2.x, import dag from airflow.decorators and EmptyOperator from airflow.operators.empty. The rest is identical.
dbt runs in its own virtual environment inside the Airflow image, so its dependencies never clash with Airflow's:
FROM apache/airflow:3.1.0

RUN pip install --no-cache-dir "apache-airflow==${AIRFLOW_VERSION}" \
    astronomer-cosmos apache-airflow-providers-snowflake

RUN python -m venv /opt/airflow/dbt_venv && \
    /opt/airflow/dbt_venv/bin/pip install --no-cache-dir dbt-snowflake
Airflow runs with Docker Compose on a second EC2 instance, also created with Terraform and deployed with the same GitHub Actions pattern as the generator.
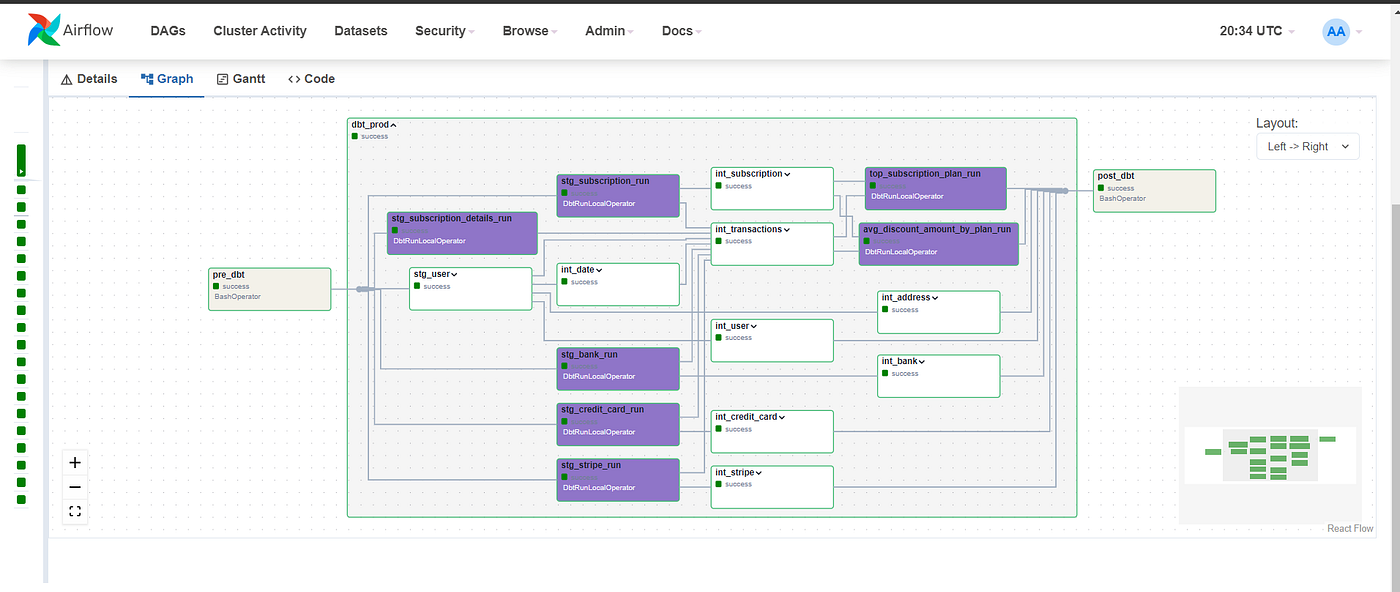
Step 6: What should the dashboard look like?#
Keep it simple. The dashboard reads from the marts and shows net revenue and average discount by subscription plan. No fancy charts, just the numbers the question asked for.
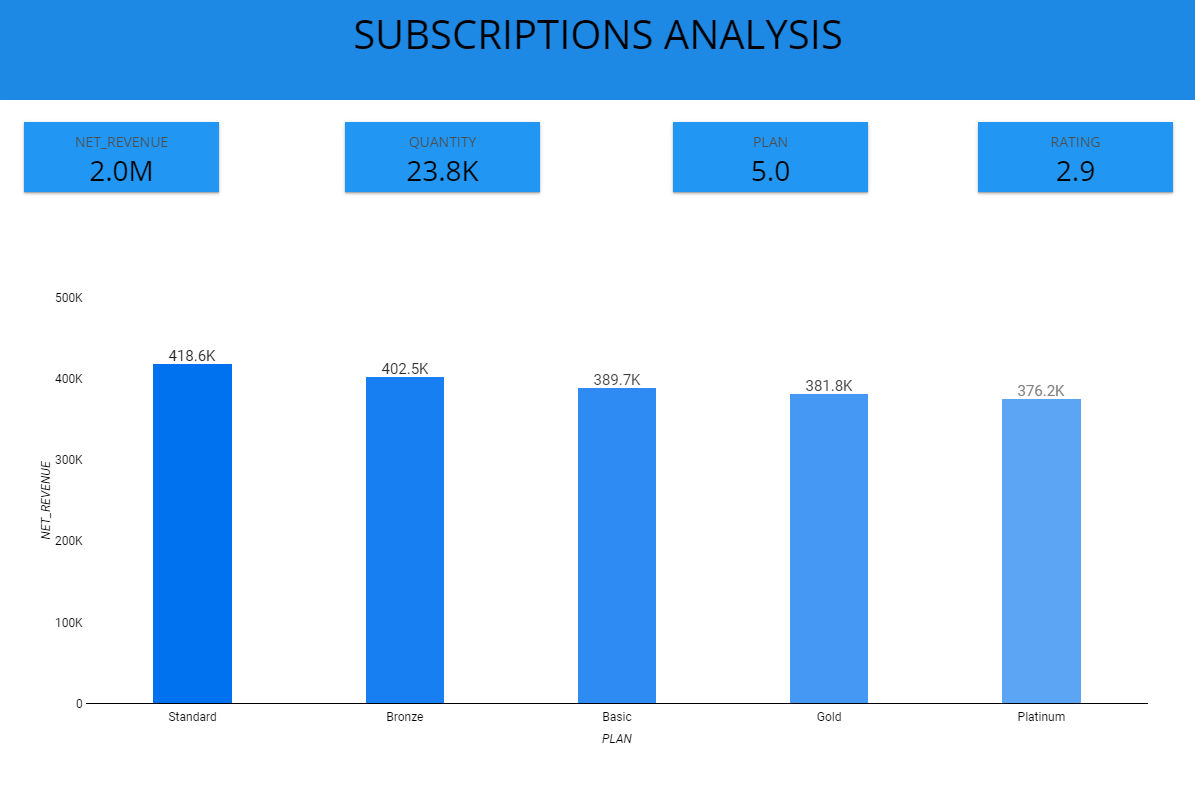
That is the point of the whole stack: once the marts are right, building a dashboard people actually use is the easy part.
What would I change if I built it again in 2026?#
The architecture holds up. The details around security and operations are where I'd spend the extra time:
| Area | What I built in 2024 | What I'd do now |
|---|---|---|
| CI/CD auth | SSH private key in GitHub secrets | GitHub OIDC role, deploy through SSM, no open SSH for deploys |
| Network | Port 5432 and 22 open to 0.0.0.0/0 | RDS only reachable from the bastion SG, port 22 limited to Airbyte IPs |
| Orchestration | Airflow 2.8 on EC2 with a fixed 3-hour gap after Airbyte | Airflow 3 (or managed: MWAA, Astronomer), triggering dbt when the Airbyte sync finishes instead of guessing a time |
| dbt testing | dbt_unit_testing package | Native dbt unit tests, plus dbt build in CI on every pull request |
| Snowflake auth | User and password | Service users with key-pair auth |
| Snowflake objects | Created by hand | Managed in Terraform with the Snowflake provider |
| Date dimension | Derived from user timestamps | A proper date spine with dbt_utils.date_spine |
| Data generator | Long-running container on EC2 | Scheduled ECS Fargate task or Lambda, no server to patch |
None of these change the shape of the platform. They make it safer and cheaper to run, which matters more than the first build.
How does this platform make your team AI-ready?#
Every team wants AI agents that answer questions like "which plan made the most money last quarter?" The model is rarely the problem. The data is.
An LLM pointed at the raw Postgres tables would have to guess which user row is current, how to convert text timestamps, and whether net revenue includes discounts. It will guess wrong some of the time, and it will sound confident when it does.
This platform removes the guessing:
- One definition per metric.
net_revenueis calculated once, in dbt, and tested. An agent reads the mart instead of inventing its own formula. - Documented models. dbt YAML descriptions and lineage give an AI tool the context it needs to choose the right table. Tools like the dbt MCP server or Snowflake Cortex Analyst can use that metadata directly.
- Fresh, deduplicated data on a schedule. An agent is only as current as the last successful pipeline run.
- Clear permissions. The role model in Snowflake means you can give an AI tool read access to
ANALYTICS.financeand nothing else. That's the order we follow with clients at Dublo: data foundations first, then AI systems on top of them. Skipping the first step is how you end up with a chatbot nobody trusts.
FAQ#
Can you really build a data platform in one week?#
Yes, for a focused scope: one source, one warehouse, a handful of models and one dashboard. Managed tools like Airbyte Cloud and Snowflake remove most of the setup work. The week goes into networking, modeling and testing, not installing software.
Do I need Airflow to run dbt on a schedule?#
No. For a small project, dbt Cloud's scheduler or a GitHub Actions cron job running dbt build is enough. Airflow earns its place when you have several steps to coordinate, like waiting for an ingestion job, running dbt, then refreshing extracts or triggering alerts.
Why use Airbyte instead of a custom Python ingestion script?#
Incremental loading, deduplication, schema changes and retries are all solved problems in Airbyte. Writing them yourself takes days and then needs maintenance. Custom scripts make sense when no connector exists or when volume makes per-row pricing too expensive.
Is Snowflake the right warehouse for a small team?#
It works well if you keep warehouses at XSMALL with a 60-second auto-suspend. BigQuery is a strong alternative, especially if you already use Google Ads or GA4, and DuckDB or MotherDuck can cover very small workloads. The modeling approach in this post works the same on all of them.
What is the difference between dbt data tests and unit tests?#
Data tests run against real data and check things like uniqueness, nulls and accepted values. Unit tests run your model against fixed mock inputs and check that the SQL logic produces the expected output. Data tests catch bad data, unit tests catch bad code.
Key takeaways#
- A useful data platform answers four questions: where data comes from, where it lives, how it moves and how it becomes usable.
- Use managed tools for the commodity parts (ingestion, warehouse) and spend your time on modeling and tests.
- Structure Snowflake with separate raw, dev and prod databases and least-privilege roles from day one.
- Layer dbt as staging, intermediate and marts, and test both data and logic.
- The same clean, documented marts that feed your dashboard are what make AI tools give correct answers. If you want a platform like this built for your own data, without spending the week yourself, we set up data foundations that your team owns from day one. Book a call with Dublo and tell us what you're working with.